Page 1 of 1
Tie down locations
Posted: December 30th, 2015, 10:56 am
by Big Jim
Hi All
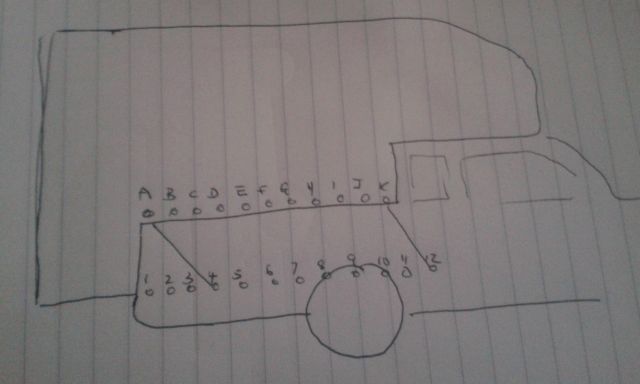
Just doing a survey on where you fix down your camper. Mine is fixed A-4 and K-12
It is fixed with Happijak turn buckle thingies . The front one is rigid , the rear is sprung . I have been reading a lot on best positions and looking at mine there is nothing to stop the rear end arcing upwards and bouncing . It has deformed the fixing point 4 on the truck as well .
I would like to keep the front fixing as it is as both ends are good fixings.
I thought i may change the back to something like D-1.
What do you think ?
Jim
Re: Tie down locations
Posted: December 30th, 2015, 2:04 pm
by zildjian
Looks about right though I might have made the rear set more vertical to shorten the link a fair bit, as I feel its main job is to keep the back down less than pull forwards,
the first speedbump you don't notice will likely reinforce this theory
we've all done it.
will they all be tensioned by turnbuckles Jim?
Re: Tie down locations
Posted: December 30th, 2015, 2:21 pm
by keeflester
I'm using something similar. My position would roughly match A2, K10. I don't think there is ever likely to be a large force pulling the rig backwards, except if I was going off-road up a steep hill, too fast. I can be pretty sure that won't happen. I'm anticipating the front or back rising from a sudden upward jolt and have designed accordingly. To be honest, that's the same arrangement that Greig used when he fitted my Northstar. I'm a little concerned about what would happen over an un-noticed speed bump but I've tried to build in a little give. Time will tell if it's successful, or otherwise.
Re: Tie down locations
Posted: December 30th, 2015, 3:19 pm
by rubberrat
A2 J13 (You don't have a 13 - mine is on the buck upstand)

Rear fixing (shown through access hatch in camper), faces slightly forward to prevent rearward shift

Bottle screws

Lashing eyes – Marine stainless fitted to rear corners and front upstand near the factory fitted lashing points (too feeble for a demountable)

Large spreader plates to dtribute forces over the thinner buck steel - fitted under rear lashing eyes

I had the chassis beefed up too to make sure that the up forces on the front of the buck don't pull the chassis/buck fixings out.